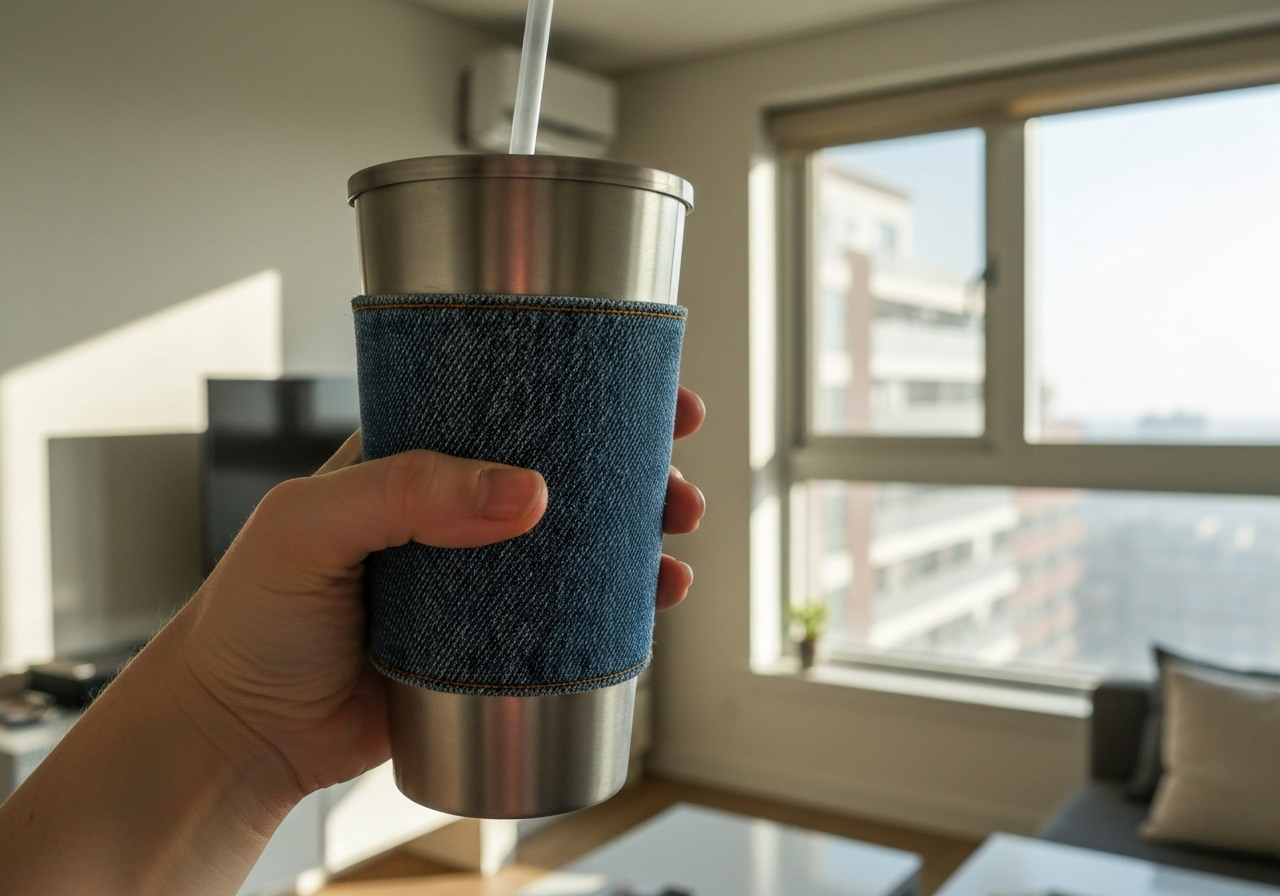
Let’s talk about one of life’s simple pleasures: a perfectly chilled iced coffee on a warm day. It’s a ritual, a treat, a necessity! But for the eco-conscious renter, that daily delight can come with a side of guilt. The flimsy cardboard sleeve, the stack of napkins to combat condensation, the single-use nature of it all… it adds up. While we can’t all install solar panels on our apartment buildings, we can absolutely tackle the small, everyday habits that make a big difference. That’s why we’re going to show you how to make your own reusable iced coffee cup sleeve. It’s a simple, space-saving, and incredibly satisfying project that solves the slippery-cup problem and helps you reduce waste, one delicious sip at a time. Why Bother Making Your Own Coffee Sleeve? You might see reusable sleeves for sale, so why make one? As renters, we’re masters of ingenuity and making the most of what we have. This little project is the perfect embodiment of that spirit. It’s a Waste-Reducer: Say goodbye to those disposable cardboard sleeves and the wad of napkins you use to keep your hands dry. This one sleeve can prevent hundreds of pieces of paper waste from entering a landfill each year. It’s (Basically) Free: This project is all about upcycling! You can make a fantastic, functional sleeve using materials you almost certainly already have, like an old sock, a worn-out t-shirt, or scraps from another project. It’s Perfectly Personalized: Choose a fabric that matches your tote bag, your coat, or just your vibe. It’s a small way to bring your personal style to an everyday item. It’s Renter-Friendly: No drills, no nails, no landlord approval needed. This is a small-scale craft you can easily do at your kitchen table or on the living room floor in an afternoon. The Super-Easy, No-Sew Sock Method This is the ultimate entry-level project. If you have five minutes and a rogue sock that lost its partner in the laundry, you can make this. It’s surprisingly effective and a brilliant way to give that lonely sock a new purpose. What You’ll Need: An old (but clean!) sock, preferably a thicker, crew-style one A pair of sharp scissors Fabric glue (optional, but recommended) Step 1: Grab Your Sock Find a sock that’s been living a single life in your drawer. A thicker, athletic-style sock works great for absorbing condensation, while a patterned sock adds a fun pop of color. Step 2: Measure and Cut Slide the sock over your favorite reusable coffee tumbler or a standard disposable cup to gauge the height. You want it to cover the main area you’d hold. Once you have a good idea, lay the sock flat and cut the “tube” part of the sock off, separating it from the heel and toe sections. A 4-5 inch section is usually perfect. Step 3: Secure the Edge (Optional) The cut edge of a knit sock can unravel over time. To prevent this, simply run a thin line of fabric glue around the inside of the cut edge. Let it dry completely according to the package directions. That’s it! Your no-sew coffee sleeve is ready to go. The Customizable Scrap Fabric Method (Simple Sewing) If you have a bit more time and want something more polished, this method is for you. It’s a great way to use up fabric scraps from old clothing or other projects. You can do this by hand-sewing, so don’t worry if you don’t own a sewing machine! What You’ll Need: Scrap fabric (denim, flannel, thick cotton, or even an old towel work well) Measuring tape or a ruler Scissors A fabric marker or pin Needle and thread Step 1: Measure and Cut Your Fabric Take your favorite coffee cup and wrap the measuring tape around the middle to get the circumference. Add about one inch to that measurement for a seam allowance. Next, decide on the height (4 inches is a good start). Cut a rectangle of fabric using these two measurements. Pro-tip: For extra absorption and insulation, cut two identical rectangles and place them on top of each other. Treat them as one piece for the next steps. Step 2: Pin and Sew the Side Seam Fold your fabric rectangle in half lengthwise, with the “pretty” sides of the fabric facing each other. Pin the long edge together. Using your needle and thread, sew a simple straight stitch about a half-inch from the edge, creating a tube. Be sure to knot your thread securely at the beginning and end. Step 3: Finish the Edges Turn your fabric tube right-side out. To create a clean, finished look and prevent fraying, fold the raw edge at the top down about a half-inch toward the inside of the sleeve. Do the same for the bottom edge. Sew a simple hem all the way around on both the top and bottom. This final step makes it look much more professional and ensures it will last through many coffee runs and washes. And there you have it! Two simple, sustainable ways to upgrade your iced coffee experience. By taking a few minutes to create your own reusable sleeve, you’re not just making a cute accessory; you’re taking a practical, powerful step toward a less wasteful life, right from the comfort of your rented home. Happy crafting!
DIY Reusable Iced Coffee Cup Sleeve: The Perfect Eco-Friendly Renter Hack